You've got a new drop ready, a video pulling attention, and one bio link trying to serve everyone at once. Fans click through, see a wall of equal-priority buttons, and leave without buying, subscribing, or telling you what brought them there. The problem usually isn't a lack of audience. It's that your link-in-bio page behaves like a directory when it should behave like a storefront.
A link in bio creator system works better when it gives each campaign one clear job. That might mean selling a limited merch drop, collecting emails before a launch, or sending viewers from a tagged video straight to a product. With zero-inventory production, you can test those offers without buying stock first, while tokenized attribution shows whether attention turns into attributable revenue.
Table of Contents
- Why Your Bio Link Is Your Real Storefront
- Build Your Zero Inventory Storefront Without Guesswork
- Tag Products Directly in Videos So Fans Never Leave
- Design a High Converting Page That Prioritizes One Action
- Measure What Matters With Clean Attribution
- Launch Checklist and Next Steps for Consistent Revenue
Why Your Bio Link Is Your Real Storefront
A new drop can attract attention through an Instagram Reel, a YouTube video, a QR code at an event, or a TikTok launch clip. The visitor arrives with a different level of intent each time, but the bio page still has one job: make the next action obvious. A wall of equal-priority links sends people searching. A focused mini-storefront gives them a clear path to buy, subscribe, book, or share their details.
Instagram's one-link constraint helped create the link-in-bio category. Creators needed a controlled destination because Instagram allows a clickable bio link, but not links in regular captions or comments. TechRadar's account of the category's evolution describes these tools as a workaround that emerged about a decade ago. That workaround became infrastructure for routing attention from social content to owned commercial actions.
The category's growth shows how widely creators needed that routing layer. Statista reported that Linktree had approximately 50 million users after launching in 2016, while independent late-2024 coverage estimated that about 31 million Instagram users had adopted link-in-bio tools. The same coverage placed Linktree at about 24.7 million users and roughly 79.95% of that market. Those figures also show the trade-off in copying the standard model: a directory can handle many destinations, but it rarely prioritizes the action tied to the visitor's current intent.
Practical rule: Your bio link should answer “What should this visitor do next?” rather than “Where can people find me?”
For a creator running zero-inventory drops, the page can display the product, show the design in context, collect demand, and send the order to a production system. That system can handle manufacturing, fulfillment, shipping, customer service, and returns. You avoid buying stock before demand exists, while a tokenized attribution setup connects the visit or tagged video to the resulting action.
The stronger model uses one primary action, native video tagging, and clean attribution. Fewer links reduce decision friction, embedded commerce keeps fans closer to the offer, and tokenized tracking helps separate attributable purchases from raw page visits. Measure purchases, email capture, app downloads, bookings, and qualified sponsorship inquiries, then cut destinations that do not support the campaign's main goal.
Build Your Zero Inventory Storefront Without Guesswork
Start with the raw material you already have. A product brief can be a text prompt, URL, video, image, or campaign note. The useful question isn't “What can I print?” It's “What would make sense for this audience, this moment, and this piece of content?”
A practical setup sequence looks like this:
Define the drop. Write the audience, message, product type, color direction, and campaign context in plain language. For example, a cooking creator might turn a recurring phrase from a recipe series into a small apparel collection, while a gaming creator might build a drop around a visual motif from a launch video.
Generate product directions. Use the brief to create several design routes, then remove anything that feels generic, hard to read, or disconnected from the creator's existing identity. The point of generation is speed, not automatic approval.
Check garment accuracy. Review the design on the actual product shape, placement, fabric color, and proportions. A graphic that looks strong on a flat canvas can fail once it's placed on a sleeve, hoodie, or fitted garment.
Curate the assortment. Don't publish every variation. Choose a tight set that gives fans a meaningful choice without turning the page into a catalog. The Trendlytic POD research can help you inspect competing product positioning and identify patterns worth considering before you finalize the offer.
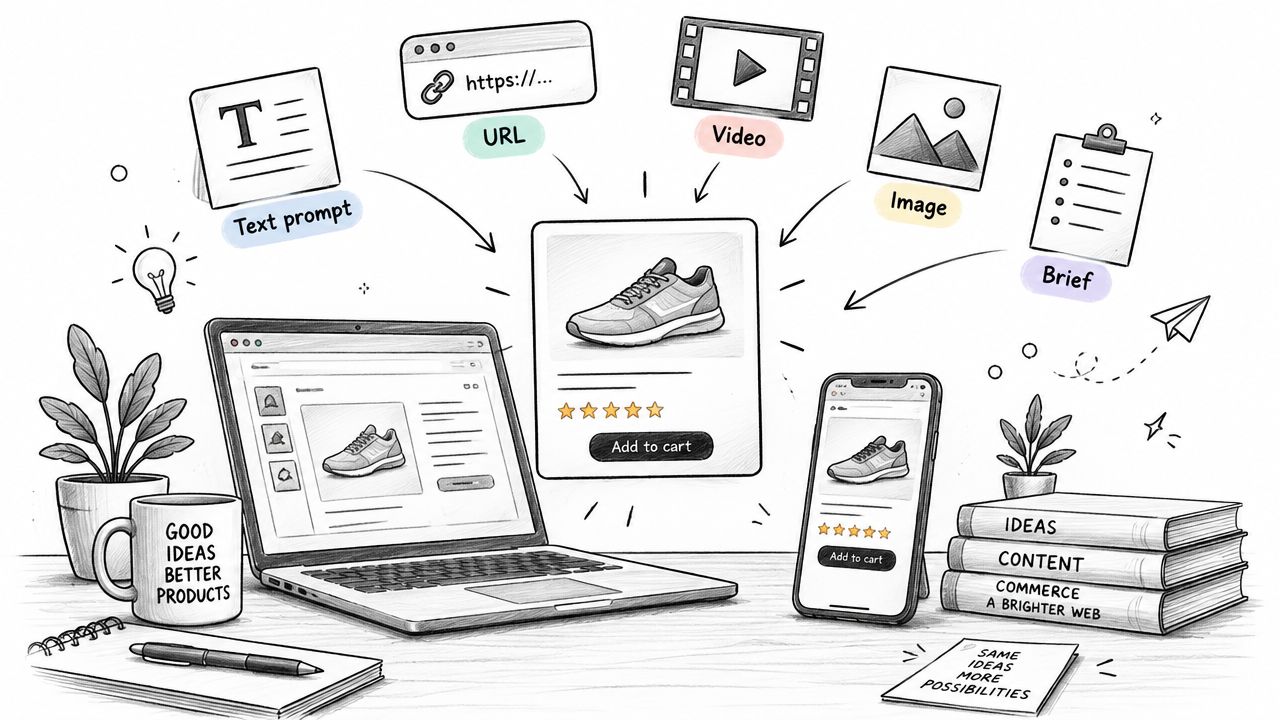
A zero-inventory workflow is valuable because the creator doesn't have to commit cash to a warehouse before the audience responds. FLYP's operating model turns creator inputs into designs across 600+ premium blanks, with garment-accurate previews available for approval. Once you approve a product, the production and post-purchase work can run through the same storefront rather than forcing you to stitch together a design tool, printer, shipping provider, support inbox, and returns process.
You can learn more about the operating model in this explanation of what zero-inventory means for creators. The important distinction is operational: zero inventory removes stock risk, but it doesn't remove the need for curation. A weak design still produces a weak offer, even if fulfillment is automated.
Make the page useful for fans and partners
Keep the storefront recognizable as yours. Use a consistent visual system, name the collection clearly, and write product descriptions that connect the item to the content that inspired it. A brand partner should understand your positioning quickly, while a fan should know why the drop exists and what to do next.
Before publishing, test the page on a phone. Check image loading, product variants, checkout flow, shipping information, and support details. Then publish the storefront as the destination for the current campaign, not as a permanent archive of every project you've ever made.
Tag Products Directly in Videos So Fans Never Leave
A storefront captures profile traffic. Native product tagging captures buying intent at the moment a viewer sees the item. That distinction matters in tutorials, hauls, reviews, launch videos, and behind-the-scenes content, where the product naturally appears inside the story.
Connect your approved product catalog to YouTube Shopping, then attach the relevant product to the point in the video where it appears or becomes relevant. A tutorial can tag the shirt worn throughout the episode. A launch video can tag the new item when the design is revealed. A haul can tag each product as it enters the frame, provided the sequence remains easy to follow.
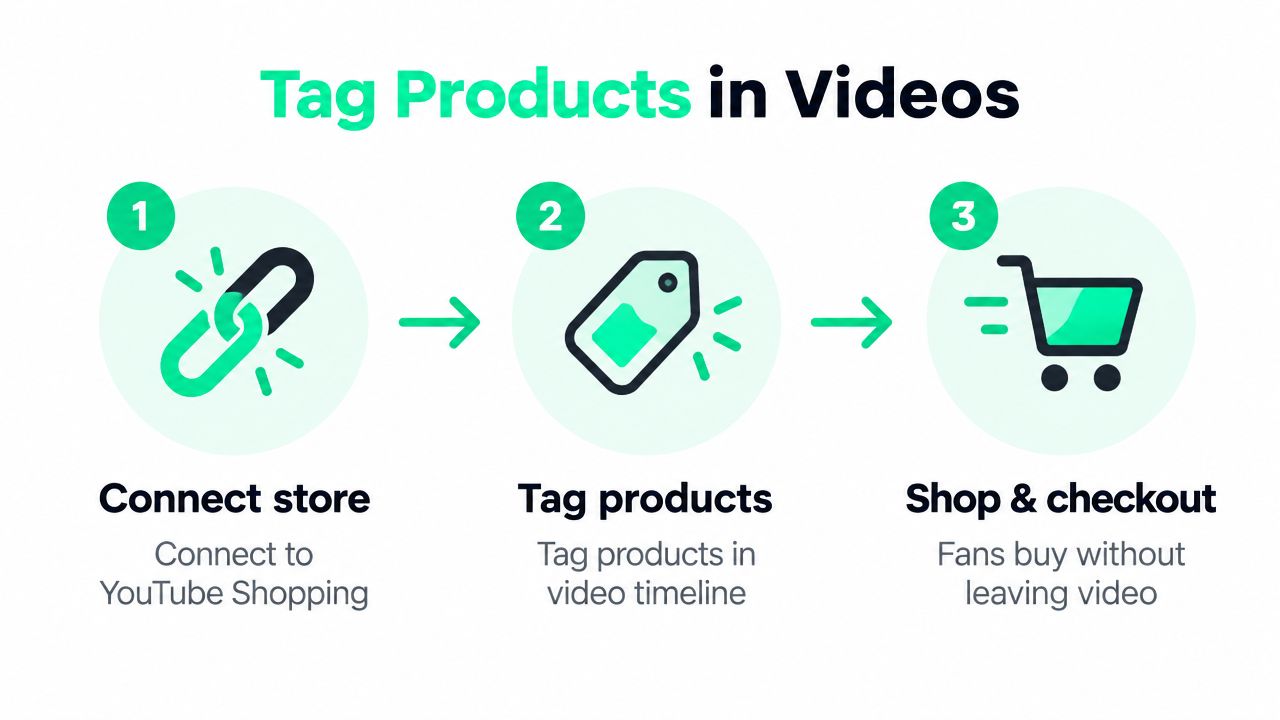
The workflow is straightforward, but the merchandising decisions require judgment:
- Match the tag to the moment. Tag the product viewers can see or understand immediately. Don't attach an unrelated item because it's available in the catalog.
- Keep the spoken CTA natural. “The collection from this video is tagged below” fits the content better than interrupting the video with an aggressive sales pitch.
- Use the bio storefront as the campaign home. Anyone who arrives through your profile should find the same product, creative, and message shown in the video.
- Retire old priorities. If the video promotes a new drop, move that drop to the primary position in the storefront instead of making viewers search through older links.
The buyer experience improves when discovery and checkout stay close together. Fans shouldn't have to remember a product name, leave the video, open a profile, find a directory, and then identify the right item. Native tagging shortens that chain.
Creators who lack polished product footage can also produce supporting assets before launch. A practical resource on product video creation for small businesses can help you plan short demonstrations, rotations, and visual reveals from your existing product inputs. Use those assets to strengthen the video itself, not to add decoration around a weak offer.
For a deeper workflow on connecting content to commerce, see this guide to shoppable video content. The operating principle is simple: tag the product where intent forms, then make the same product easy to find from the bio page for viewers who discover the campaign later.
Design a High Converting Page That Prioritizes One Action
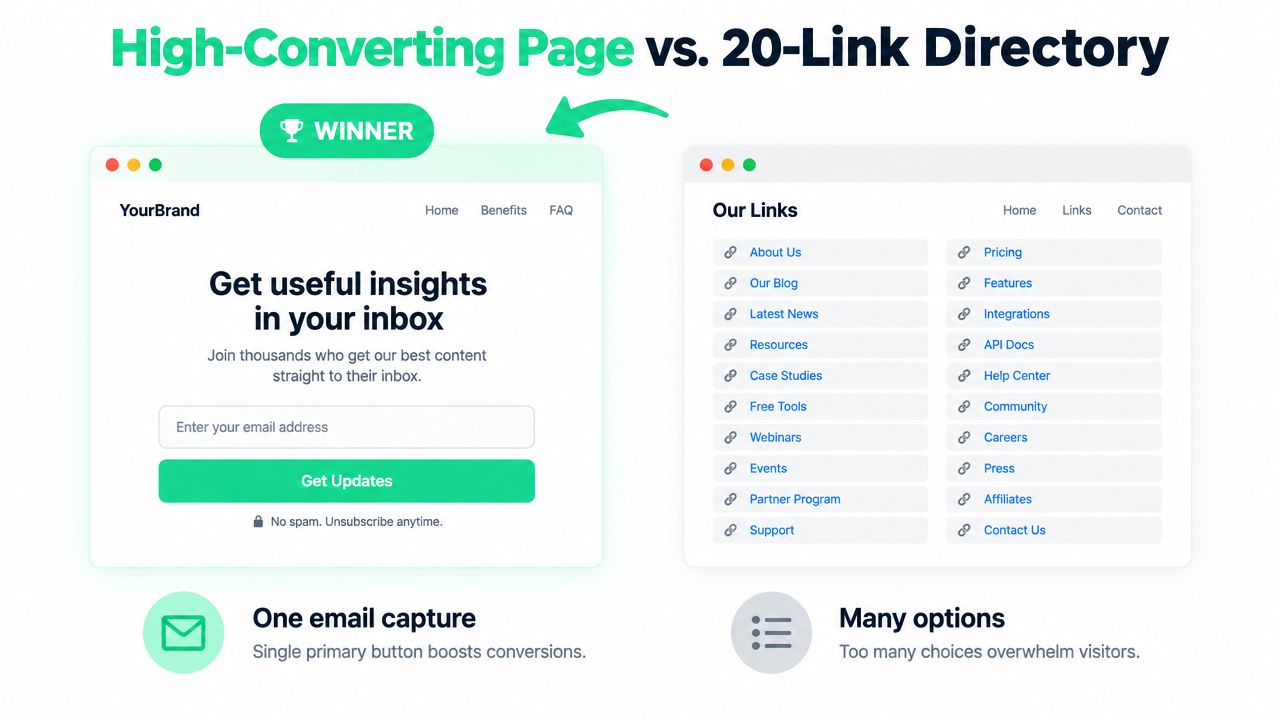
A twenty-link directory gives every destination the same opportunity and asks the visitor to do the merchandising. That's backwards. Your job is to decide which action matters most for the current campaign, then make that action visually and verbally dominant.
The conversion hierarchy is also practical. In a benchmark covering 267 campaigns, email signups converted at 8% to 12% of link clicks, app downloads at 5% to 7%, and e-commerce purchases at 2% to 4%, according to InfluenceFlow's link-in-bio benchmark guide. Those figures don't mean every audience will follow the same pattern. They do show why cold visitors often need a lower-friction first step before you ask for a purchase.
Put intent ahead of completeness
Your first screen should contain the campaign promise, a strong product or video preview, and one primary button. Secondary destinations can remain available, but they shouldn't compete with the campaign. Rich media, embedded video, and native product presentation can communicate more than a stack of labels such as “Shop,” “About,” “Newsletter,” and “My links.”
Use this decision matrix to choose the primary action:
| Audience Type | Best Primary CTA | Why It Converts |
|---|---|---|
| Cold viewers from discovery content | Email capture or a relevant lead magnet | It asks for a smaller commitment while giving the visitor a clear reason to continue |
| Warm followers familiar with the creator | Current product drop | Familiarity reduces the explanation needed before a purchase |
| Viewers watching a product-focused video | Tagged product or direct storefront checkout | The product is already connected to the content they're consuming |
| Potential brand partners | Sponsorship inquiry or media kit | A focused business action prevents partners from searching through fan-facing links |
| Existing customers | New collection or replenishment action | The visitor already understands the brand and can move directly to the next offer |
The page should change when the campaign changes. A creator promoting a new drop shouldn't leave an old lead magnet above it for weeks. A creator seeking sponsorships shouldn't make a brand manager scroll past unrelated fan links to find contact information.
The strongest page is often the one with the least unnecessary choice. Recent guidance on link-in-bio design argues that the old model of the oversized link list is giving way to a mini-storefront with fewer links, richer media, embedded video, and campaign-specific routing. Treat that as a design direction, not a guarantee. Your own attribution data should decide whether a secondary link earns its place.
Measure What Matters With Clean Attribution
Clicks tell you that someone tapped a button. They don't tell you whether that person bought, joined your list, booked a call, or submitted a sponsorship inquiry. A creator running multiple platforms needs a measurement method that follows the visitor from source to outcome without treating every page visit as revenue.
Use tokenized attribution with a fixed window. Assign a unique source token to each traffic origin or campaign, record clicks that carry the token, and count only purchases containing the matching token inside the same attribution window. The defensible formula is:
Conversion rate = attributed purchases ÷ attributed clicks
Choose either a 7-day or 30-day window and keep it consistent. The link-in-bio conversion benchmark methodology explains why inconsistent windows can distort comparisons and why attributed purchases matter more than raw taps.
Separate traffic quality from tracking quality
The same benchmark set reported an average conversion rate of 2.8% for professional link-in-bio platforms versus 0.5% for free tools, with platform-specific benchmarks ranging from 1.2% on TikTok to 2.3% on YouTube and 0.6% on Instagram. These comparisons don't prove that a paid tool automatically creates demand. They show that tooling, attribution persistence, funnel design, and traffic source can all affect the observed result.
Track each destination using the same framework:
- Product sales: source token, attributed click, product viewed, purchase, and refund status.
- Email capture: source token, landing-page click, signup, and later purchase when your system can connect those events.
- Bookings: source token, booking-page visit, completed inquiry, and qualified appointment.
- Sponsorship leads: source token, inquiry submission, and whether the request matches your commercial criteria.
Raw clicks are useful for diagnosing the upstream profile-to-link step. They're not the final score. A creator with strong content but weak profile conversion should improve the CTA, profile copy, or page hierarchy before redesigning the product itself.
For a broader way to connect campaigns to business outcomes, use this framework for revenue attribution. The discipline is more important than the dashboard: label every source, preserve the token through checkout where possible, and compare like with like.
Launch Checklist and Next Steps for Consistent Revenue
A storefront becomes useful when you operate it as a campaign system, not when you publish it once and forget it. Before launch, confirm the product preview, title, description, variants, checkout, shipping information, returns path, and mobile layout. Then verify that the primary CTA matches the content currently driving people to your profile.
Your launch checklist should include:
- Approve the offer: Remove designs that don't fit the audience or campaign.
- Set the primary action: Put the current drop, lead magnet, or inquiry route first.
- Create source tokens: Give Instagram, TikTok, YouTube, QR codes, and campaign variants distinct labels.
- Tag the video: Connect the relevant product to the moment it appears.
- Test the buyer path: Complete the journey from profile or video to checkout on a phone.
- Schedule the rotation: Decide when the storefront will change as the campaign moves on.
- Review outcomes: Compare attributed purchases and qualified actions, not just taps.
After launch, change one meaningful variable at a time. If clicks are weak, revise the profile CTA or the content-to-profile handoff. If clicks are healthy but purchases are absent, inspect the product presentation, offer clarity, checkout friction, or traffic intent. If email capture is strong but sales lag, build a follow-up path instead of forcing every visitor to buy immediately.
The zero-inventory model gives creators room to test creative ideas without carrying unsold stock, but operational simplicity only helps when the storefront stays focused. Rotate the page around the current drop, use native video tagging where intent appears, and let tokenized results determine what remains prominent.
FLYP LTD turns creator inputs into on-brand merch, publishes zero-inventory link-in-bio storefronts, and supports native YouTube Shopping so fans can discover and buy products without leaving the video. Visit FLYP LTD to build your first approved drop and connect it to a measurable creator funnel.